How TLS Certificates Work
TLS certificates are issued by trusted third-party organizations called Certificate Authorities (CAs). The certificate contains information about the server’s identity, such as the server’s domain name and public key. When a client connects to a server over HTTPS, the server sends its certificate to the client to verify its identity.
The client checks the certificate to ensure that it is valid and issued by a trusted CA. The client also checks that the domain name on the certificate matches the domain name of the server it is connecting to. If the certificate is valid and the domain name matches, the client establishes a secure connection with the server.
TLS certificates are typically valid for a fixed period of time, after which they expire and must be renewed. If a certificate is compromised or becomes invalid for any reason, it must be revoked and replaced with a new certificate.
Table of Contents
· Obtaining TLS Certificates
· Configuring TLS Certificates
· PEM
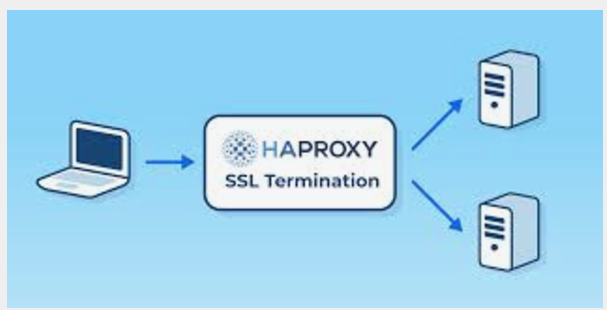
· TLS Verification Flow Between Two Web Services
· Creating a Self-Signed Certificate with OpenSSL
· Example Golang Program that uses TLS Certificates
· Creating a Kubernetes certificate with CSR
· Conclusion
Obtaining TLS Certificates
To obtain a TLS certificate for your server, you’ll need to generate a Certificate Signing Request (CSR) and submit it to a trusted CA. The CA will verify your identity and issue a certificate that you can use to secure your server.
There are many CAs that offer TLS certificates, including free options like Let’s Encrypt. When choosing a CA, it’s important to select a trusted provider that offers reliable certificates with good browser compatibility.
Configuring TLS Certificates
Once you have obtained a TLS certificate, you’ll need to configure your server to use it. The specific steps for configuring TLS will depend on the server software you are using, but in general, you’ll need to:
- Install the certificate on your server
- Configure your server to use HTTPS instead of HTTP
- Configure your server to redirect HTTP traffic to HTTPS
It’s important to configure TLS correctly to ensure that your server is secure. You should also regularly monitor your server’s TLS configuration to ensure that it remains up-to-date and secure.
PEM
PEM stands for Privacy Enhanced Mail and is a text-based format for storing cryptographic objects such as private keys, public keys, and certificates. The PEM format is widely used in Unix-based systems, including Linux and macOS.
PEM files are encoded using Base64, which allows the files to be easily transmitted and stored as text. The encoding also ensures that the files are compatible with a wide range of software and operating systems.
PEM files typically begin with a “ — — -BEGIN” line and end with a “ — — -END” line, with the content in between being the encoded cryptographic object. For example, a PEM-encoded certificate might look like this:
----BEGIN CERTIFICATE-----
MIIDxzCCAi+gAwIBAgIULnFuz6UHm6U1xucUvnwC/5n5BJIwDQYJKoZIhvcNAQEL
BQAwFjEUMBIGA1UEAxMLZXhhbXBsZS5jb20wHhcNMjAwNzAxMDczODMwWhcNMjEw
NzAxMDczODMwWjAWMRQwEgYDVQQDEwtleGFtcGxlLmNvbTCCASIwDQYJKoZIhvcN
AQEBBQADggEPADCCAQoCggEBAKcL+ij7oY65/XzcFTVXeN+DNdkn1tztzykwJzti
SZZxRzfIwYsGmP/vxr4KyXm3fI4QHXzEx/+ihkC3yqkl3mggQw+YzoOZPTcgsZ9v
Jd+kWb25VYjNOSW8Jw7NkZT+TtTIZItRr8Fv2JnGm1nYbYJdWpCtJq3JHtZxtFVj
LEJgBLdV7OuAlzweKQY8fdIzvPw+KjMcT22rJc8F+Msc1v7e0jKzeJz+k8+IlG3a
0nTDmSndZzhfXpBrA3q3/dlLptxyC4jsYjKbRn+b2JZplUaZ6apMjt14J/9xvTHG
bsfwy+CGkN6SmEsl6U5wrEB/mZlL+nQOVX0CAwEAAaMhMB8wHQYDVR0OBBYEFKU1
f92SkgZ/v9XimBq3h3xn4z4MIGYBgNVHSMEgZQwgZGAFKU1f92SkgZ/v9XimBq3h
3xn4z4oWqEhpB8wHjEbMQswCQYDVQQGEwJTRTEPMA0GA1UECAwGTG9uZG9uMREw
DwYDVQQHDAhMb25kb24xEzARBgNVBAoMCk9wZW5BSS5jb20xDzANBgNVBAMMBk9w
ZW5BSS5jb20wggEiMA0GCSqGSIb3DQEBAQUAA4IBDwAwggEKAoIBAQCrC
TLS Verification Flow Between Two Web Services
- A client sends a request to a server over HTTPS.
- The server responds with its SSL/TLS certificate, which contains its public key and identifying information, such as the domain name and the CA that issued the certificate.
- The client verifies the server’s certificate by checking its digital signature, expiration date, and other details to ensure that it is valid and has not been tampered with.
- If the certificate is valid, the client generates a random symmetric key and encrypts it with the server’s public key from the certificate.
- The client sends the encrypted symmetric key to the server.
- The server decrypts the symmetric key using its private key, and uses it to encrypt and decrypt subsequent communication with the client.
- The client and server can now communicate securely over HTTPS using symmetric encryption with the shared key.
This TLS verification flow ensures that the client is communicating with the intended server and that the communication is secure and confidential. If the client cannot verify the server’s certificate, or if the certificate has been revoked or expired, the connection will fail and the client will not send any sensitive information to the server.
In addition to server verification, clients can also verify their own identity to the server using client-side certificates. In this case, the server would also request a client-side certificate during the handshake, and the client would need to present a valid client-side certificate signed by a trusted CA in order to establish a secure connection. This provides an additional layer of security and authentication for the communication between the client and server.
Creating a Self-Signed Certificate with OpenSSL
In some cases, you may need to create a self-signed certificate for testing or development purposes. OpenSSL is a popular tool for generating self-signed certificates.
To create a self-signed certificate with OpenSSL, you can use the following command:
openssl req -x509 -nodes -days 365 -newkey rsa:2048 -keyout server.key -out server.crtThis command generates a new private key (server.key) and a self-signed certificate (server.crt) that is valid for 365 days.
You’ll need to provide some information when generating the certificate, such as the server’s domain name and location information. This information will be included in the certificate and used to verify the server’s identity.
Example Golang Program that uses TLS Certificates
To demonstrate how to use TLS certificates in a Golang program, we can create a simple HTTPS server that uses the self-signed certificate we just generated. Here’s an example program:
package main
import (
 "crypto/tls"
 "fmt"
 "net/http"
)
func main() {
 http.HandleFunc("/", func(w http.ResponseWriter, r *http.Request) {
  fmt.Fprint(w, "Hello, World!")
 })
 server := &http.Server{
  Addr: ":8080",
  TLSConfig: &tls.Config{
   MinVersion: tls.VersionTLS12,
  },
 }
 err := server.ListenAndServeTLS("server.crt", "server.key")
 if err != nil {
  panic(err)
 }
}
This program creates an HTTPS server that listens on port 8080 and serves a “Hello, World!” message. The server uses the self-signed certificate (server.crt) and private key (server.key) that we generated earlier.
Note that we also specify a TLSConfig for the server that sets the minimum TLS version to 1.2. This is a recommended best practice to ensure that your server uses the most secure TLS version available.
Creating a Kubernetes certificate with CSR
- Create a private key for the CSR:
openssl genrsa -out myapp.key 2048This command generates a 2048-bit private key and saves it to a file named myapp.key.
2. Create a CSR using the private key:
openssl req -new -key myapp.key -out myapp.csr -subj "/CN=myapp.example.com"This command generates a Certificate Signing Request (CSR) using the private key created in step 1, and sets the Common Name (CN) of the certificate to myapp.example.com. The CSR is saved to a file named myapp.csr.
3. Create a Kubernetes CSR object with the contents of the CSR:
apiVersion: certificates.k8s.io/v1beta1
kind: CertificateSigningRequest
metadata:
  name: myapp.example.com
spec:
  groups:
  - system:authenticated
  request: $(cat myapp.csr | base64 | tr -d '\\n')
  usages:
  - digital signature
  - key encipherment
  - server auth
This creates a Kubernetes CSR object with the name myapp.example.com and specifies that the certificate can be used for digital signature, key encipherment, and server authentication.
4. Submit the CSR to Kubernetes:
kubectl create -f myapp-csr.yamlThis submits the CSR object to Kubernetes.
5. Approve the CSR in Kubernetes:
kubectl certificate approve myapp.example.comThis approves the CSR and creates a signed certificate in Kubernetes.
6. Retrieve the signed certificate:
kubectl get csr myapp.example.com -o jsonpath='{.status.certificate}' | base64 --decode > myapp.crtThis retrieves the signed certificate from Kubernetes and saves it to a file named myapp.crt.
7. Create a Kubernetes secret with the certificate and private key:
kubectl create secret tls myapp-tls --key=myapp.key --cert=myapp.crtThis creates a Kubernetes secret named myapp-tls with the private key and certificate data.
You can then use the Kubernetes secret in your deployment or service YAML to enable HTTPS communication using the signed certificate.
Conclusion
In this blog post, we covered the basics of TLS certificates and how to use them to secure your applications. We also provided practical knowledge for developers, including how to create a self-signed certificate with OpenSSL and how to use TLS certificates in a Golang program.
By following best practices for TLS certificate management and keeping your server’s TLS configuration up-to-date, you can help ensure that your applications are secure and protected against unauthorized access.